Solar: Let’s get going!
Starting to put it together
Once you know how much usage you will have based on the data you have acquired reading the last tidbit of information. The amp draws or watts of appliances and/or items NECESSARY for success while living off-grid with solar. It is time to get going.
We emphasize NECESSARY to make you think. For instance; Do you need air conditioning? Do you need to run a microwave? Think your starting to see what we’re trying to say. Can you do all this off-grid? Absolutely! As an HVAC contractor and consultant I have always told my clients; “With your money and my time we can do anything”. So if you have deep pockets by all means we can do anything. Just get the information together and lets get going living off-grid with solar.
How much do I need?
Great question. We add up all the amps or watts and get a total. We’ll use the Renogy Solar Calculator. You will need the total watts of your off-grid with solar requirements. Here is an example of possible NECESSARY things to us with there wattage along with how long I will use them in a days time :
| APPLIANCE | WATTS/ TIME PER DAY | WATTS/AMP HRS PER APPLIANCE |
| Television | 400 watts/ 2 hours | 160 watts/ 133 AH |
| Refrigerator | 400 watts/6 hours | 480 watts/ 400 AH |
| Coffee pot | 650 watts/ 1 hour | 130 watts/ 108 AH |
| Laptop computer | 50 watts/ 2 hours | 20 watts/ 16.7 AH |
| Water pump | 72 watts/ 1 hour | 14.4 watts/ 12 AH |
| Lighting (15 watt LED) each | 6 watts/ 6 hours | 6 watts/ 7.2 AH |
| Fan | 24 watts/ 4 hours | 19.2 watts/ 16 AH |
| Propane/CO2 Alarm | 3 watts/ 24 hours | 14.4 watts/ 12 AH |
| Radio | 9 watts/ 4 hours | 7.2 watts/ 6 AH |
| TOTAL WATTS PER DAY | WATTS X HOURS= WATTS PER DAY 4,574.5 WATTS/ DAY |
852 WATT SYSTEM 709 AH STORAGE |
Breaking it down
We ran each appliance through the Renogy solar calculator then added up the findings. As you can see by the breakdown, of what we feel are necessities for living, there are things that can be removed from the list and re-figured accordingly. For instance if you have a dual fuel refrigerator you can run on propane and save 480 watts and 400 AH.
We like to run our dual fuel refrigerator on AC voltage during the day and LP at night in a perfect setting of course. Doing this cuts our 6 hours of guessed run time in half and because we will typically be in bed and not snacking. We don’t use much propane in this configuration.
Of course there are safety things that you don’t want to forget, for example the LP gas/CO2 alarm. That one is very important. Water pump pretty important but a gallon jug next to the toilet and another next to the sink can do the same thing. You can make your off-grid experience as comfortable as you want.
Now what?
Now we can have a baseline of our wants for an off-grid experience. Although it can be an upfront expensive decision you can always start small and build on it from there. For instance start with a 200 watt system but run wires large enough to a controller that you can build off of.
An example of such a thought is to run 8 gage wire from your roof to where you want to mount your control. This is based on the amp draw necessary to support the 800 watts using the information in the last post where amps= watts/volts. Let’s get to some more nitty gritty for living off-grid with solar.
Let’s Make it Real
We know we will be operation on a 12 volt system. Right? Most standard Rv’s run on 12 volt systems. This is where it gets a little confusing. Note the spec sheets of the panels your using and you will see that they can give usually around 18 volts DC. So back to the formula using our Renogy 100 watt solar panel: amps = 100 watts/ 17.9 volts this will give an answer of 5.58 amps.
Looking at the specifications from the Renogy website there is a little discrepancy in the math. Not gonna lie it is even more confusing. They show that the amps will be 5.72 amps, this accounts for loss within the panel from what we can figure out. So in a perfect world this is the amperage based off the “Vmp” (voltage maximum power). In short use the amperage that shows higher for the establishing a wire gage and circuit protection.
Series or Parallel
Now we have established system size, amperage needs lets start getting our system together. The 800 watts system will require, to keep it simple, 8 solar panels 100 watts each. As mentioned above note they produce a maximum voltage of 17.9 volts so all 8 tied in series, meaning each panel’s negative terminal goes to the next panels positive terminal and so on. This will increasing voltage as it continues. So let us add that up 17.9 x 8 = 143 Volts. Remember now we need to see if a controller can handle that kind of voltage. Our Renogy 40 amp MPPT controller can only handle 100 volts of input so this configuration will not work for us.
Pros and Cons of Series Wiring
Series wiring simply is wiring the positive of one panel to the negative of another panel and so on. In the end you end up with a positive and negative terminal to bring back to the controller. My personal experiences has found that series wiring can have some loss. For instance if half the panels are in direct sunlight and the other half is in the shade it will drastically reduce the output of the panels and not perform as well as we would like.
Real Life Numbers
On the upside in a perfect world the voltage will be higher reducing the amperage. What does that mean? As a recap, higher voltage brings lower amperage. 5.72 per panel x 8 panels = 45.76 amps total based on the 17.9 potential volts per panel. Now we have 143 volts and 800 watts brings us to 5.59 true amps. 800 watts / 143 volts = 5.59 amps. Which greatly reduces the wire size required. We went from needing 4 gage wire for the 45 amps to 12 gage wire for the lower amperage (number gage of wire increases as the the size decreases) This is based this on a 24 feet of wire run needed for this example project.
Series Wiring Illustrated
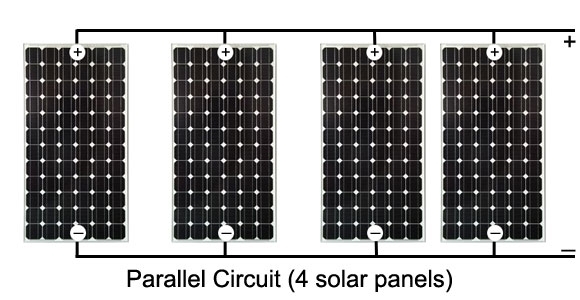
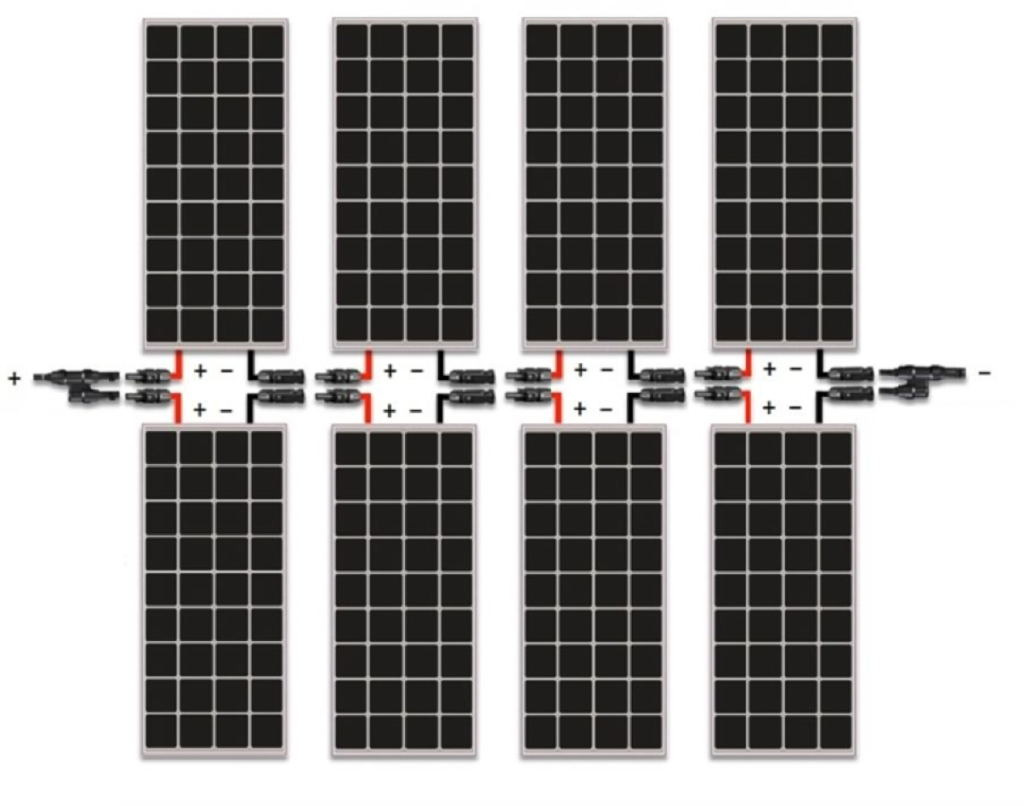
Pros and Cons of Parallel Wiring
Parallel wiring is both positive and negative of each panel getting back to the solar charge controller. In this configuration shadows or sunlight variations from panel to panel will not effect individual panel output. In short each panel produces its maximum potential, giving it to the solar charge controller. The other advantage of this is the voltage will remain at the panels maximum voltage output. So if all panels can produce 17 volts than the voltage getting back to the controller will be up to 17 volts.
Down side to this configuration is because of each panel can produce its individual maximum potential this means the wire size to will need to handle the amperage of that potential. For instance If all 8 panels are providing maximum amperage of 5 amps that can be 40 amps. So now we need to consider the wire sizing to accommodate that load. It can be expensive living off-grid with solar upfront the payoff is priceless.
Parallel Wiring Illustrated
Take Away
Given all this information now the question is what should you do? Personally we like to put both series and parallel into the configuration. As of right now we have 600 watts in three sets of series panels. Explained it is two panels in series facing the same direction towards the sun, in parallel with two more panels also in series also facing the same direction with again two more panels in series too facing the same direction. In short think of it as if our fifth wheel RV is facing due North the solar panels are able to absorb 200 watts from each direction of the sun, the south, east and west. Solar panel placement is also an important factor while laying them out on the roof.
Purchase a control that has capability of what your end result should be. 800 watts of solar will put you into a 60 amp solar controller minimum based on a 12 volt DC system. If you want to use a higher volt system for your inverter than that is a whole other topic at which we will get into once we get through this. This information though will need to figured out before you purchase anything. For this reading we will keep it simple and stick to a 12 volt system so as not to go put any cart before the horse.
Here are some quick links that will help you get started and save you a couple of bucks.
Disclaimer:
Some links on this page are affiliate links. This means by clicking a link and making a purchase you will help support another Damm Fine Adventure. Thank you for support.
